
Our definitive guide will show you 15 ways to clean data in Excel. Learn more about data cleansing through useful examples.
Clean data and string manipulation formulas in Excel are critical! In addition to the well-known techniques, we will introduce special VBA codes to make the process quicker and more effective.
Table of contents:
- Sorting data to check extremes and peaks
- Remove duplicates to clean data
- Use the find and replace function
- Check the type of data in a cell
- Convert numbers stored as text into numbers
- Eliminate blank cells in a list or range
- Clean data by splitting the text into columns
- Concatenate text using the TEXTJOIN function
- Change text to lower–upper–proper case
- Remove non-printable characters using the CLEAN formula
- Remove unnecessary characters from text automatically
- Clean extra spaces using the TRIM function
- Insert text after specific nth characters
- Delete the text after the nth character
- Remove special characters from a text
- Regular Expressions
Introduction to Data Cleansing in Excel
Data cleansing is Excel, not just a task; it is an art that turns raw data into a masterpiece of insights and information. The path to learning this art begins with understanding the foundation: Excel. Our guide does not just walk you through the fundamental steps; it searches into the lesser-known methods, revealing 15 effective ways to clean your data. We introduce a world where Excel’s string manipulation formulas and VBA codes become your friends in the battle against data clutter. We will show you special VBA codes that accelerate the cleansing process, making it effective and efficient.
Imagine the satisfaction of filtering through millions of data points to identify the outliers or the aid when you remove duplicates with a simple click, ensuring a clean dataset. We will explain multiple scenarios with practical examples, demonstrating the power of Excel’s functions – like ‘Sort’, ‘Text to Columns’, ‘TRIM’, and the ‘CLEAN’ formula.
But the tutorial is not just about cleaning what is visible. It goes beyond addressing the invisible threats like non-printable characters and excess spaces that lurk within your sheets, waiting to undermine your analysis. Moreover, we tell a personal story and provide tips that make the journey through data cleansing a learning adventure. It is about transforming a boring task into an opportunity to explore the full potential of your data.
Finally, we introduce our Excel add-in, DataXL, transforming complex string manipulations into child’s play.
Effective ways to clean data in Excel
Let’s start with the basics! Sometimes, the best method is to go “back to the roots” and start the data cleansing project with simple but effective solutions.
Prologue
Before we take a deep dive into this topic, allow us to tell a personal story.
After college, I worked at a small company with limited HR resources. As newbies, they didn’t dish out the easy tasks for me. Okay, let’s clean the data in Excel. I got countless boring tasks. The main issue was how to create clean data just in time. I had never heard of the Excel string manipulation functions, so the solution wasn’t simple – many night shifts; good, old days.
After that, we formed our own company and worked on various plans. Finally, we had enough resources to develop a powerful Excel add-in for data cleansing.
We aim to make text manipulation and Excel data processing a child’s play for you. So today, we publish a universal Excel add-in tool. From now on, string manipulation and data cleansing will be easy! Read more about the utility.
#1 – Sorting data to check extremes and peaks
Is it possible to find errors in a list using simple sorting? Yes! We have nothing to do but arrange the data in a growing or decreasing order. Right-click on the cell and choose the ‘Sort Largest To Smallest’ option from the menu. Seldom can there be found extremely small or large, maybe peeking data?
Look at the picture below:
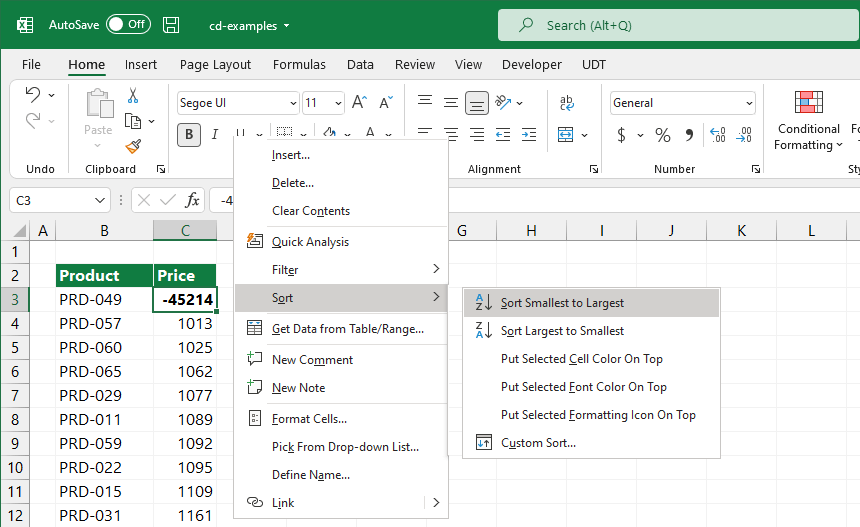
Who would ever think you could find these mistakes in several million records? Alternatively, conditional formatting can find errors and blanks in a range.
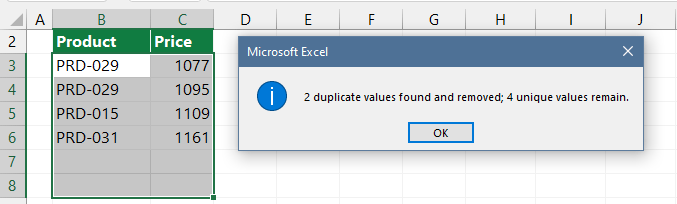
#2 – Remove duplicates to clean data
Excel supports many options to eliminate duplicates. For example, two tightly joined operations filter unique values and remove duplicated data. The result is the same in both cases: a list of unique values.
To filter for unique values (filtered list), use the Advanced command on the Data tab in the Sort & Filter group.
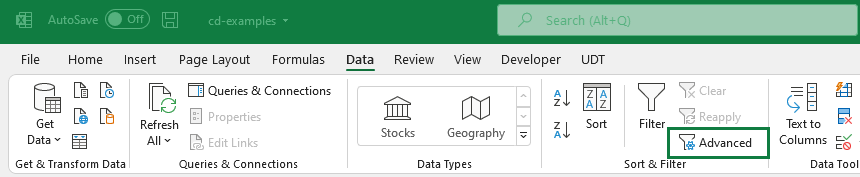
Select the range of cells, then go to the Data tab. In the Sort & Filter group, click Advanced. Next, select the Unique Records Only check box and click OK.
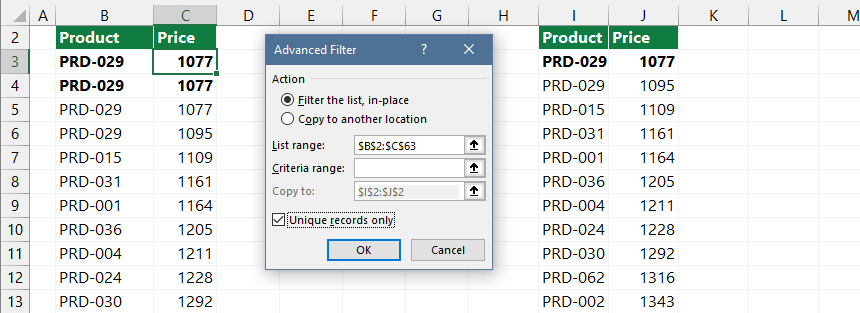
Explanation: However, there is one significant difference that we cannot ignore. In the process of filtering unique values, it temporarily hides the duplicated values. You can go back to your original list to undo this operation.
You’ll permanently delete duplicates using the ‘Remove Duplicates’ tool on the ribbon. Pay attention to this! The removed items will last after saving the Workbook, so be careful.
Let’s see how the duplicate removal values tool works! First, select the range. Then, go to the Data tab! In the Data Tools group, click Remove Duplicates.
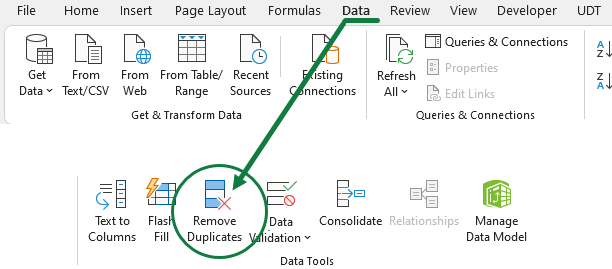
Select one or more columns, then click OK. A message box will appear, showing how many duplicated values are removed and how many unique ones remain.
Finally, read this definitive guide to learn more about removing duplicates.
#3 – Use the find and replace function
The advantage of the Find & Replace function is that we can work with it relatively fast in any size data table. First, let’s see how to clean data using this function. To find and replace data in a worksheet, follow these steps:
Press the Ctrl+H keyboard shortcut, and the Find and Replace dialog box appears.
In the Find What box, enter the data you want to locate. Then, enter the Replace With box with the data you want to replace.
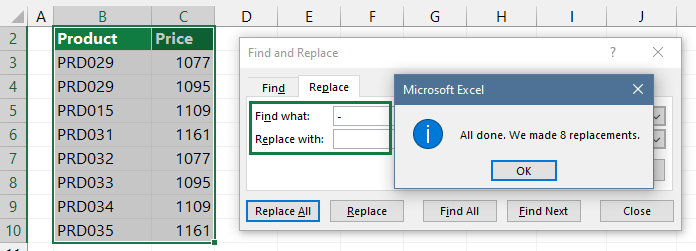
If you want to replace all occurrences simultaneously, click Replace All.
#4 – Check the Type of Data in a Cell
Please wait a minute before we make any changes to the raw data.
We have to check the type of data in the cell. We can do this by using the TYPE function, which is one of a group of information functions. Is it numeric or text data? In the picture below, you can see the results the formula brings for different data types.
Post a Comment